Playing with Collabracam for The Zebra Print Webshow
This afternoon my kids and I spent a few hours playing with the iOS application Collabracam, which permits multiple cameras to be used simultaneously in a video shoot. We found the application buggy and in need of an update, but the idea of the app is GREAT and we ended up creating a reasonably cool 3.5 minute video for “The Zebra Print.” In this post I’ll share some of our lessons learned using Collabracam.
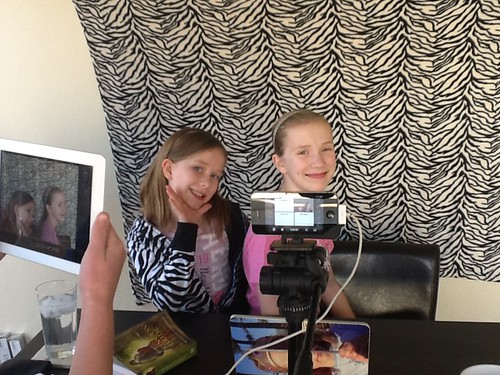
Collabracam allows you to use up to five iOS devices at the same time to make a video. One iOS device is used as the base station, in ‘director’ mode. The other devices (up to four) can be remote cameras, connecting to your director base station device via wifi. We used two remote cameras and a base station for our video.
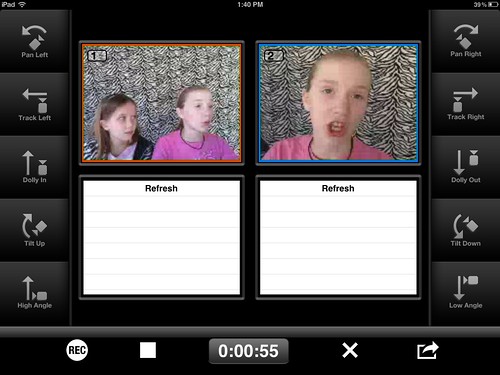
Initially we tried using an iPad2 as the base station, and another iPad2 and an iPhone4 as the remote cameras. The Collabracam base station / director app gave us errors, however, so we read some of the app documentation and learned it’s best to use the SAME MODEL of iOS device. We didn’t have 3 of the same device, so we changed to use the iPhone4 in director mode, and both the iPad2’s as remote cameras. Once you have the app installed a device can take either role (director / base station or remote camera.) While we got our setup to work, I want to test the app and see if the errors we ran into are eliminated if all devices are the same iOS model. The screenshot below shows Collabracam on the “director” device. You can see the live video from both iPad2s.
We ran into problems when we started, stopped, and started over with the app. The director / base station device in most cases didn’t “see” the remote cameras when we started over. To fix this, we found closing every instance of Collaboracam on all devices (double clicking the home button, holding down a finger on one of the apps so they started to ‘jiggle,’ and then clicking the red X in the upper left corner) fixed the problem. We found the connections between cameras and the director / base station device work best when you:
- Open the iOS devices which will serve as remote cameras FIRST, and select the camera option on both.
- Secondly, open Collaboracam on the device you’re using in “director” mode as the base station, and then you should be able to immediately connect to the remote cameras.
We ended up doing thirteen different takes, at least in part, for this 3.5 minute webshow. The episode we finally took was number twelve, but I had to edit it together on my computer. That’s not how Collaboracam is supposed to be used. After you finish shooting a video, you should leave all the remote camera app devices open. The director / base station app will transfer the videos from each remote camera to itself, so they can be put together in a final video file. For some reason, however, in our “take 12” our Collaboracam setup recorded and saved one scene on both cameras. As a result, the app didn’t know which one to insert into the final video so it was omitted. (That’s the one I had to insert on my laptop using QuickTime Pro 7.) The most confusing and frustrating part of using Collaboracam was figuring out how to switch between our different cameras during the live show, and having the apps malfunction. According to the documentation, on the director / base station device to you start recording you should:
- Click on the desired camera and press the REC button. It should turn red.
- Click on the secondary / standby camera you want to use next. It should turn blue.
When you want to change to the standby camera, on the director / base station you should click the REC button, and then select the next standby camera. Perhaps because we used two iPad2s and 1 iPhone4, and not all identical iOS devices, our remote cameras did NOT change status from “recording” to “standby” as they should have when cameras were changed on the director / base station device. The colors (red and blue) changed on the director app, but for some reason that communication didn’t reach the remote cameras to display properly. The remote cameras recorded fine, but the “remote / recording” status light didn’t change as it should have.
Overall this was a good experience and I REALLY love the concept of Collaboracam. If you have a classroom cart of fourth generation iPod Touches or iPad2s, this would be a super app to use with students to create a recorded webshow. We tried using a Glif iPhone4 tripod mount initially when we were using the iPhone as a camera, but ended up not being able to use it since the iPads were our remote cameras. In the future I’d like to find and use some kind of iPad2 tripod mount, but I haven’t seen anything like that yet. It’s challenging to hand-hold the iPad2 for long periods of time shooting video, but switching cameras makes that a little easier on your videographers.
Unlike a television studio’s cameras, there are NOT red lights which light up on an iOS device when its camera is “live” with a Collaboracam setup. We tried having the videographer wiggle a finger to show their camera was in use, but since our “status” signs in the app weren’t working correctly I ended up just pointing to our actresses to show which camera was “live.”
Collaboracam is a $5 app, but its iTunes Store page indicated it is currently half price. I’d recommend waiting till the the app is revised and some of these bugs are worked out to buy and use it. (It’s in version 1.2 now.) The idea is GREAT, however, and if you have access to enough similar iOS devices to use it it can add a whole new layer of complexity and possibilities to your web shows!
 Stay updated on new Zebra Print web shows by following @thezebraprint on Twitter.


